You can easily capture, record and export live streaming audio, without destroying the quality, using Soundflower and Audacity, which are free tools. This following method can also be used to capture whatever sound that is played on your Mac machine.
- Download and install the latest Open-Source Audio Routing tool Soundflower.
- Download and install the excellent Open-Source Audio Editing tool Audacity.
- If required and you wish to export the captured/recorded audio stream to MP3 file format,
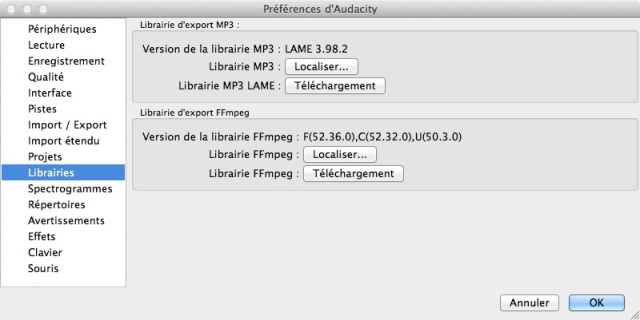
- Download and install LAME MP3 Encoder as well. Or get it directly from here. Once installed, go to Audacity -> Preferences -> Libraries and verify whether it’s properly located. If not click on the «Locate» button to locate it.
- Or go to Audacity -> Preferences -> Libraries and click on «Download» button and follow it from thereon.
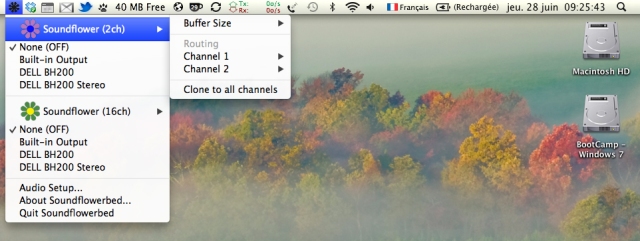
Start Soundflower (Soundflowerbed) and if required, complete the initial configuration. Soundflower icon will now be sitting on the Task Bar.
Soundflower has two modes: 1) Soundflower (2ch) – two channel and 2) Soundflower (16ch) – 16 channel along with other configured Audio Input/Output peripherals. While Mac’s Internal Speaker has 0 Inputs/2 Outputs and Internal Mic has 2 Inputs/0 Outputs, Soundflower (2ch) has 2 Inputs/2 Outputs and Soundflower (16ch) has 16 Inputs/16 Outputs.
Now to capture/record live streaming audios:
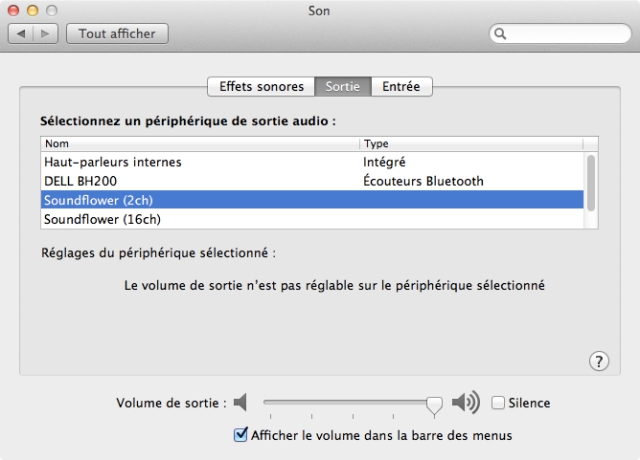
- Go to System Preferences, -> System Preferences -> Sound -> Output and select Soundflower (2ch) as Output.

- Under Sound Effects, disable all sound effects so that they will not interfere and spoil a clean recording process.
- Now launch Audacity.
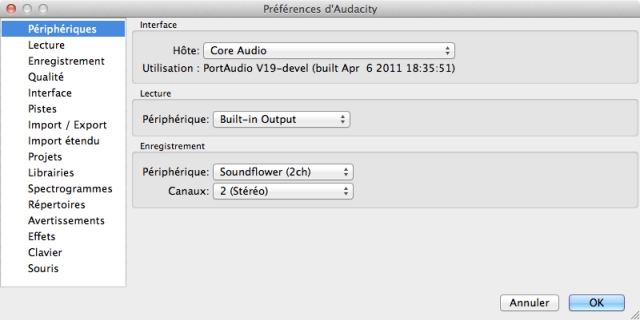
- Either go to Audacity -> Preferences -> Audio I/O, and under Recording, change the Device to Soundflower (2ch). Leave the Output Device as Built-in Output, so that you can monitor the recording process.
- Or change the settings directly in Audacity itself.
Now, you can easily record any audio streamed through internet with great quality.
First start the Audacity Recording by clicking on Record button. Then start any internet or other live stream audio (which you have already readied for playback) so that recording goes correctly. Later, you can edit the recorded sound, add effects or make any other audio manipulation that can be done using Audacity.
Once recording is done and stopped, go to File -> Export, select your favorite format like mp3, wav, aiff, etc. and click on Save. It will open another window for Tag Editting. Fill it if required or just proceed with exporting. Voilà, now you have recorded and exported a live streaming audio with same quality as streamed using Soundflower and Audacity.
Don’t forget to change the audio settings back to normal after recording your favorite audio streaming. And please respect Copyright rules.
Edited later:
A) Soundflower works great with QuickTime 7.x as well (Mine is “Pro”. I’m not sure about “Non Pro”). But no luck with QuickTime 10.x.
B) To listen to playback while recording, do the following:
- Launch Soundflower. From menu, under Soundflower (2ch), select “Built-in Output” (pervious one would be “None (OFF)“).
- Open System Preferences. Under Sound, set Soundflower (2ch) as both Output and Input.
- Now open Audacity. Set Soundflower (2ch) as “Recording Device” and 2 (Stereo) as “Recording Channels”. Leave Built-in Output as “Playback device”.
C) Suggestion:
Want to try something simple, I recommend Wondershare AllMyMusic. Lightweight. User friendly. Intuitive.
Key features:
- Easy to Use – Just One-Click Smart Recording.
- Play and Record Automatically – Records only when Audio is played. Stops and Splits when Silence.
- Record Audio with 100% Original Quality (1:1 Quality Ratio Lossless Audio).
- Identify Songs and get Music Info.
- Personalize Your Recordings – Tag Editing, Metadata Retrieval, etc.
- Seamless Integration with OS and iTunes.
- Drag and Drop CD Burning Tool.
- Record Unlimited Free Music – Over 500 Radio Stations, YouTube, Pandora, Yahoo Music, etc.
- Available for both Mac and Windows.
Technical specifications for Mac – Supported O/P format and settings:
- Format : MP3 (*.mp3), M4A (*.m4a)
- Sample Rate : 44100Hz
- Encoder : .mp3:(MP3), .m4a:(AAC)
- Bit Rate : 256kbps, 320kbps
Update 1 (For El Capitan):
SoundFlower is broken in Mac OS X El Capitan. Relax, there is a solution, in fact a better one.
- Download the newest version from here: Soundflower 2 (Signed. Beta version)
- Double click to mount the downloaded .dmg file.
- Run “Uninstall Soundflower.scpt“
- REBOOT. It is a must. You need to Reboot.
- Run the installer “Soundflower.pkg“. That’s it!
Previous SoundFlower is 2ch & 16ch. This one is 2ch & 64ch. You cannot find this new version installed in “Application” folder and hence you cannot directly launch it. It is installed as “Kernel Extension“. But, you can find SoundFlower options in “System Preferences -> Sound” and “Audacity Preferences“. Enjoy!
Update 2 (For QuickTime Player):
SoundFlower works (including the newest version) great with QuickTime Player 10.x (recent one is 10.4 (854)) as well.
- Go to “System Preferences -> Sound“
- Set both “Input” and “Output” as SoundFlower 2ch
- Open QuickTime Player -> File -> New Audio Recording
And start recording the streaming audio (or whatever the system sound) flawlessly. Enjoy!
Thanks for the read and please leave comments 🙂


Greetings from France. I have been using Soundflower in conjunction with Audacity for some time now, and with great success …. with mac Snow Leopard. However, the latest of version of Soundflowerbed 1.5.2 does not work and I have a greyed-out message “Soundflower is not installed”. Any ideas?
Hi Greetings from India. For me Soundflower has been working great since Leopard… and now works smooth with Lion as well. Try reinstalling Soundflower. Before that delete old ones: /Applications/Soundflower/Soundflowerbed, ~/Library/Preferences/com.cycling74.Soundflowerbed.plist, /System/Library/Extensions/Soundflower.kext.
Hope this helps solving your problem.
Hi Manoranjan,
and thank you for the reply.
I have just reinstalled SF but still the same problem persists.
I deleted the previous application but found nothing under
~/Library/Preferences/com.cycling74.Soundflowerbed.plist, /System/Library/Extensions/Soundflower.kext.
I think I looked in the right places and also did a spotlight search for them, but with no luck.
By the way, I have just noticed that your example photos are all in French…. I wonder why!
Hi Manoranjan,
Hope you are enjoying the weekend!
Here I have just downloaded an app called Jackpilot and miraculously the weird greyed-out message has disappeared from soundflower. Audacity is now recording properly, both with and without Jackpilot.
However, I used to be able to record silently by selecting None (OFF) in SoundFlower, but this no longer works. Any ideas?
Hi Ray,
Hope your weekend is going great as well.
Happy that you could record again using Soundflower and Audacity. However I don’t know why None (OFF) is not working for you now. Check whether any conflicting tool is causing trouble. For me, I’m using this combo since Leopard. And it’s flawless.
The Screenshots of my Mac are in French because my Mac is a French one. I bought it in France. So, Windows, Fedora (Linux) and Mac OS X all are in French 🙂
Hi Manoranjan, and thanks for your great page! In synthesis, when you record in this way – audacity/soundflower) – you can’t listen in real time what you’re recording? Or am I wrong? thanks and please reply
Bye 🙂
Greeting form Italy
Hi again,
No conflicting tools are operating… the None (OFF) selection does work; however, that causes the recording to cease. A real mystery.
I thought that English could be selected through system prefs…. still, if you are fluent in French that must add a ‘soupçon’ of ‘je ne sais quoi’….
Cheers.
Ray
Hi Ray,
Je parle couramment français. Donc pas de souci.
I even have a tool, which instantly changes the language and launches a particular App in that language. So, no issues regarding any language.
Anyway, I tried my best to understand and solve your problem. But I don’t have any solutions to offer. Sorry. If I find the cause of your problem, I will write to you.
Thanks.
Hi Manoranjan,
Problem finally solved after I discovered I somehow had downloaded an earlier version of Audacity. Most foolish no doubt.
Thank you for all your patience.
Cordialement.
Ray
Hi Ray,
I was supposed to suggest you to check Audacity and it’s version or it’s encoders. Anyway, glad that your problem got solved.
Where do you live in France?
Amicalement
Région Centre… une toute petite ville qui s’appelle La Châtre.
Brilliant, just what i was looking for. Also works great with Quicktime. 🙂
Hi DJ, Thanks for the Quicktime tips. It works great with 7.x (Mine is “Pro”. I’m not sure about “Non Pro”). But no luck with 10.x.
Any way thanks 🙂
Thank you Manoranjan, great instructions, exactly what I was looking for. Regards Simon
Hi Simon, Thanks for your comment. As mentioned in DJ’s comment (previous one), Soundflower works great with Quicktime 7.x as well. Regards
Thanks Manoranjan for simplifying the process into this neat little three step guide (Soundflower, Audacity, Lame). It works perfectly. Already excited about the new possibilities this presents…!
HI Jacob, Thanks for your comments. More exciting news is Soundflower also works with QuickTime 7.x.
Well written, thanks! I think it would be possible to use AppleScript or something to automate the process as well. But, AppleScript is just so strange… 🙂
Hi, Thanks for your comments.
First time using it, OSX Lion, worked as a charm!!
Thanks a lot man!!
UNbelievablly Helpful! Thank you! When All other attempts failed to work this blog was the solution! I use an intel mac (lion) and no other site (including Youtubes walkthrus) could guide me step by step to be able to download streaming audio off the web except this one!
Hi, Came across this page searching for how to record online streaming audio for MAC. Thanks a lot. I followed everything that you said. Managed to test it by recording some. But I just want to know one is that can I not hear what is playing while recording? I mean while recording I cant hear what is being played. After I finish recording I change the settings of Sound again and can hear what I have recorded. But would like it if I can hear while recording so I can monitor it. Am I doing something wrong or it works that way only?
Hi Sonal,
Sorry for the late reply. You’re doing nothing wrong.
Do the following:
1) Launch “Soundflower”. From menu, under “Soundflower (2ch)”, select “Built-in Output” (pervious one would be “None (OFF)”).
2) Open “System Preferences”. Under “Sound”, set “Soundflower (2ch)” as both “Output” and “Input”
3) Now open “Audacity”. Set “Soundflower (2ch)” as “Recording Device” and “2 (Stereo)” as “Recording Channels”. Leave “Built-in Output” as “Playback device”.
It’s done. Now you can listen to playback while recording.
And don’t forget to turn back to defaults after your work is done. Thanks 🙂
Hey Manoranjan,
Thanks a lot. Did as per your instructions. And yeah it is recording with me listening to it. Thanks a lot. Sorry for the late response. Just saw your reply.
Hi Manoranjan, Still waiting for your response. In the meantime I have another problem. Since I started using Audacity, when I make a video call via gmail, the person I make a call to can hear my voice but I am unable to hear their voice. Also the video appears like an X-ray image. I have changed the audio settings to original. Can you help me?
That’s quite bizarre. There shouldn’t be any conflict between Audacity and Video.
Did you play around with Soundflower settings? Please check that. Also double verify the settings in System Preferences and Gmail.
No I have not changed any other settings in soundflower. Have checked all my System Preferences and Gmail Settings. Its strange. As I can see all youtube videos, etc clearly, so I am sure its not the video card. So what could possibly be wrong? I have tried from a different account too. Yet whoever I videochat they can see me, but I get that greenish X-ray Image. Simply cannot solve this puzzle. See if you can think of anything else. Thanks anyways 🙂
And yes another thing, I tried from my gmail account on my galaxy tablet and here everything works well. So its not the gmail account settings either.
Thanks, Manoranjan, for the tips. Very clear and practical. It is working very well for me. Wish I had come across this blog earlier! Kudos!
You’re welcome. Glad it helped you 🙂
I cannot hear the sound while I am recording. I have tried to follow these instructions you wrote:
“1) Launch “Soundflower”. From menu, under “Soundflower (2ch)”, select “Built-in Output” (pervious one would be “None (OFF)”).
2) Open “System Preferences”. Under “Sound”, set “Soundflower (2ch)” as both “Output” and “Input”
3) Now open “Audacity”. Set “Soundflower (2ch)” as “Recording Device” and “2 (Stereo)” as “Recording Channels”. Leave “Built-in Output” as “Playback device”.
It’s done. Now you can listen to playback while recording.”
BUT when I click on Soundflowerbed, no menu appears. I don’t see anyplace to choose between “Built-in Output” and “None (OFF)”.
What am I missing? Otherwise, this works very well to record streaming audio.
All the instructions in this blog should work flawlessly.
Your problem could be a result of either a bad installation or configuration of Soundflower.
Probably, like me, you didnt notice the eight-pointed star on the top-bar of the screen (to the right of “help”.)
Thank you! That was exactly the problem. It would be good to include mention of that star and its location in the instructions. I now can use Soundflower without difficulty,
Thanks Rob.
Ron, an image has been added to indicate the location of Soundflower on the Task Bar. Thanks for the tips.
Thank you very much for the instructions! Everything works perfectly
You’re most welcome. Glad it helped you.
Bonjour/bonsoir Manorajan,
Je suis du QUébec, je m’appelle Alex.
Je suis tombé sur ton blog en cherchant comment capturer l’audio depuis Leopard.
J’ai complété les 2 1ères étapes mais lorsque j’exporte, Audace me dit qu’il ne peut trouver ma bibliothèque d’exportation.
Dans les préférences de Audace/Périphériques, il est aussi inscrit que la bibliothèque FFmpeg est absente.
Saurais-tu m’orienter ?
Merci,
Alex
Salut Alex,
Pour exporter l’audio capturée en tant que mp3, tu a besoin du LAME, pas FFmpeg.
Il me paraît que tu n’a pas installé LAME. Voir la première image de ce blog et vérifier le statut du “Version de la librairie/bibliothèque MP3”.
Voici, le lien pour les deux LAME et FFmpeg “http://lame1.buanzo.com.ar”.
Le lien direct pour “LAME dmg” est “http://lame1.buanzo.com.ar/Lame_Library_v3.98.2_for_Audacity_on_OSX.dmg”.
Merci – ça fonctionne bien.
J’apprécis et je suis reconnaissant.
Bonne continuité
Alex
Thanks very much for this post. I will try these programs soon. I think Sunflower is the missing link in the puzzle for me.
best regards,
Kevin, Massachusetts USA
You’re welcome.
Thanks Manoranjan; this is very cool. Quick question. When Soundflower (2ch) is selected from System Preferences, I no longer can monitor (hear) audio through my speakers; any suggestions?
Please see the end of the blog “Edited later B)”. Hope that helps.
Hi
Thanks for the instructions….I seem to have trouble installing sunflower…latest version 1.6.6b and 1.6.5 won’t install….any ideas? Maybe an even older version?
Thanks
Mike
Hi Mike,
Sorry for the delayed reply. I was sort of off the grid for a while.
Today I installed 1.6.6b (without uninstalling previous version) on my old MacBook Pro (late 2007) running Lion (10.8.1) with no trouble at all. I also tested all of it’s functionality and again no problem. Everything works just fine.
I’m not sure why you have trouble installing the latest version. Please uninstall any previous version and try again installing the latest.
If you still have trouble 1) uninstall previous version, 2) install much older version (say from 2010) and then 3) install the latest version.
Hope this helps.
I will try your method it s a bit tricky in comparison to the easy to use STREAM RIPPER X that no longer work for LION…
Didi you know if it s possible to make it with VLC ?
Yes, you can use VLC to record streaming audio, but it’s much complicated than the method mentioned in this blog.
But again, with Soundflower you can record whatever you want that can be played/streamed using your standard audio output, i.e. internal speakers. All you need is few installations. After that it’s all about changing settings, record and then change back the settings to normal.
ok thank s i will try it
best regards
great points altogether, you just received a logo new reader.
What might you suggest in regards to your put up that you
just made a few days ago? Any positive?
Hello from Paris
Merci . c’est super . ca marche impeccable. OSX 7 Lion.
A bientôt .
Je t’en pris.
This is truly great, many thanks from Turkey!
You’re welcome.
Instructions given works with OSX 10.8.3 in Quicktime 7 Pro.
Thanks for the tips.
Dear Manoranjan,
I plan to follow your instructions for installing Soundflower & Audacity to record streaming audio on Mac. I have MacBook Air using Lion. Will it work.
I am NOT well versed in computers and plan to follow your instructions step by step.
Thanks
Yes, please go ahead.
Thanks Manoranjan. These instructions worked fine, and I’ve just managed to make a clean recording.
Best wishes from Vienna!
You’re welcome Jonathan.
thankyou verymuch….this is best instruction !, work like a charm….
Glad it worked for you Hendry 🙂
Hello Manoranjan,
this is exactly what I was looking for for several days. Thanks to your accurate description everything works well. Thank you so much.
Greetings from Hamburg
Bitteschön… glad it helped you…
Hello! Would you mind if I share your blog with my twitter
group? There’s a lot of people that I think would really appreciate your content. Please let me know. Many thanks
Please go ahead. Thanks
Thanks for the information! I am now just trying to get it set up so that the recording volume is optimal, but I can’t seem to get good recording volume without it being very loud coming from the speakers. I want the recording to be around -12dB but it’s hovering around -32dB. I would like to manipulate the speaker volume separately from the recording volume or soundflower output volume, but they are linked together by default.
Hi James, just control only the recording volume, which best suits your needs. Don’t worry about the speaker volume during recording. You must be concerned only about the recording quality and its parameters.
There is also an app called Radio in the Appstore, that I use for recording streaming radio stations:
http://radioformac.com
Thanks for the tips.
great soultion!!
Thank you for the tutorial Manoranjan ! The only thing missing is :
“Go to System Preferences, -> System Preferences -> Sound -> Output and select Soundflower (2ch) as Output.”
you have also select Soundflower (2ch) as Input setting.
Please come all the way down and see “Edited later:” Point B, 2.
Hi Manoranjan,
I haven’t yet implemented your method of combining usage of Soundflower, Audacity, and Lame MP3 Encoder, to record live streaming mp3 or m4A audio from a live365.com station on Mac OS X (for listening to later after I return home from work). (I actually am using OS X Mavericks – I don’t know if it would be a problem).
I am using iSkysoft Audio Recorder, which works very well and is very simple to use (for live365.com stations and many other supported sources of streaming audio). However, a limitation of it, and I assume your method, is that all sound recorded on my MacBook Pro Retina Display is through its sound card, causing any audio from a simultaneous activity, such as viewing and listening to a YouTube video, to be recorded also, thus ruining the intended audio recording. Thus, the computer is held hostage to one program, Audio Recorder (or similar program or method), during such recording, and doesn’t allow using it for any other simultaneous activity involving audio such as viewing a YouTube video or listening to a podcast.
Is it possible on a single laptop computer, with a trick, work-around, app, other program, etc., to record ONLY the live streaming audio from a designated source such as live365.com – and watch/listen to YouTube videos or podcasts, without their audio also being recorded? Or is the only solution to use a second computer?
I also love to use iSkysoft iTube Studio to record videos from YouTube (and many other supported
sources), even multiple ones simultaneously, for watching later. It doesn’t have the above limitation of recording video or audio; its recordings are not interfered with by any audio I’m listening to while recording YouTube videos. One difference between it and Audio Recorder is that, instead of the source going through the sound card, the (YouTube, etc.) URLs are simply copied and pasted into iTube Studio. If only audio recordings (such as from live365) could be made similarly by the copying and pasting of a URL for the live streaming audio – perhaps this would overcome the limitation of recording currently playing audio through the sound card.
Lastly, iSkysoft Audio Recorder has the capability of identifying songs recorded by using id3 tags, but apparently not so for (1)such a long unbroken audio stream and (2)such obscure songs (probably can’t be identified by GraceNote MusicID Technology). Audio Recorder can be set up to split or filter audio for a certain length of silence, but I think this would be very hit-and-miss and would chop off portions of songs. Even then, I am sure the songs I am listening to would still be too obscure to be identified. Do you know of any other software or method that can automatically split songs and identify them – even after recording – especially on a Mac, but on a Windows or Linux PC if not available for Mac? It will be very labor intensive, but I can only think that to split the songs up, I might have to edit the recorded stream in a program such as Audacity. It would be great if something like the smartphone apps Shazam and Soundhound for iPhone and Android, would work on a pc / Mac OS X / or other pc operating system to identify the songs.
I can later identify what songs were recorded because, as I am using Audio Recorder, I am also using an automatic screen shot app (InstantShot!) to take timed snapshots of the continuously updated page of the songs being played.
Forgive me for such a long post.
Thank you.